If you want to make money from your website, you’ve probably heard of Google AdSense. It’s one of the most popular advertising platforms online, and is used by over 40 million active sites. However, to get the most out of it, you’ll need to learn how to integrate AdSense with WordPress.
In this post, we’ll introduce Google AdSense and talk about what makes it so useful. In just 7 simple steps, you can integrate Google AdSense with your WordPress website and start monetizing your content. This post will walk you through the process of signing up for AdSense, adding the necessary code, and optimizing the appearance of your ads with the help of plugins. Learn how to make the most of this popular advertising platform and start earning money from your blog.
An introduction to Google AdSense
If you’re interested in earning a little extra revenue, Google AdSense is one of the first solutions to check out. AdSense enables you to easily insert ads on your website – you just need to place some code on your site, and Google will handle the rest. Your visitors will see relevant ads, and you’ll get paid based on how many people view and interact with those messages.
This solution is great for beginners. It’s easy to get started, and it integrates with just about any platform – including WordPress. To use Google AdSense, you’ll just need to meet a few basic requirements, such as having an active site that complies with Google’s program policies.
Of course, there are alternatives to Google AdSense, and it’s worth taking a look at those solutions too. However, for most users AdSense is a great first step in monetizing your website.
How to integrate AdSense with WordPress (in 7 steps)
Signing up for the Google AdSense program and placing ads on your site is a pretty simple process. Let’s walk through it together!
Step 1: Sign up for Google AdSense
What are the prerequisites for integrating AdSense with WordPress?
To integrate AdSense with WordPress, you need two things:
- A Website
- A Google Account.
Once you have these, go to the Google AdSense website and click on Get Started. After selecting an account (preferably one dedicated to your website), fill out a simple sign-up form where you enter your website’s URL, home country, and choose whether to receive customized suggestions. Finally, check the Terms and Conditions box and click on Start using AdSense to access the AdSense console.
Step 2: Connect your WordPress website to Google AdSense
The next step to integrate AdSense with your WordPress website is to connect it to your Google AdSense account. To do this, go to the console’s left-hand menu and select Sites.

Then, click on Add Site and enter your website’s URL in the subsequent popup. Save and continue, and copy the AdSense code to your WordPress website. The easiest method to do this is by using the Site Kit plugin,
which is designed to help integrate various Google services with your website, including AdSense. Once activated, go to the dashboard and verify that you own the website by logging into your Google account.
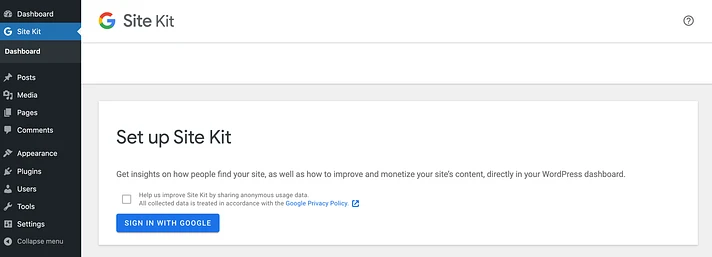
Finally, grant permission for Site Kit to access your Google account data and Search Console, and your site will be connected to your Google account.
Step 3: Add the Google AdSense code to your website
You can now use Site Kit to set up various Google services. To integrate AdSense with WordPress, navigate to Site Kit > Dashboard. Find the Google AdSense section, and click on its accompanying Connect Service link:
When prompted, log into your Google account. Sit Kit will now request access to your AdSense data. If you’re happy to proceed, click on Continue.
Site Kit can add the necessary AdSense code to your site automatically. This enables Google to place advertisements across your WordPress website. Since it’s the easiest way to integrate AdSense and WordPress, just push the Let Site Kit place… slider into the On position.
Then click on Continue. The Site Kit plugin will now add the required code to every page of your website.
Step 4: Optimize & Control where your Google ads appear
-
Optimize your Google ads
To optimize your ad performance on your site, Google provides an auto-ads feature. This feature scans your website and strategically places ads in the most effective positions based on various factors such as page layout, content volume, and existing Google ads.
With auto-ads, you can potentially increase your earnings without any manual intervention. Hence, it’s suggested to enable this feature. To activate it, simply click on “Enabled auto ads for your site”.
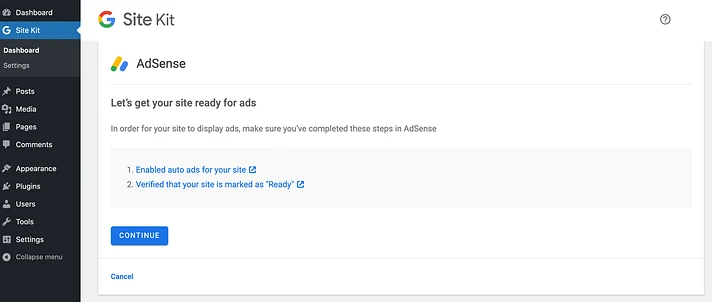
This will launch a new tab. Here, push the Auto ads slider into the On position:
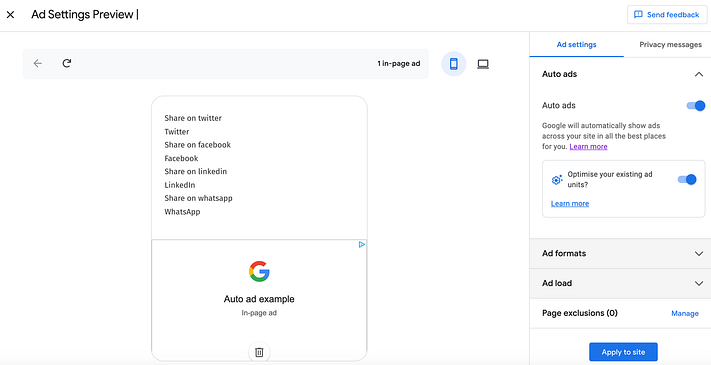
By default, Google will also optimize any existing ad units that are already on your website. This can boost your revenue, so you’ll typically want to leave that setting enabled. However, it is possible to disable it, using the Optimize your existing ad units slider.
-
Control where your ads appear
Advertisements can be a great way to monetize your content or generate additional revenue, but having too many ads can negatively impact the user experience and even discourage visitors from returning to your website. Fortunately, you can set a limit on the number of ads that Google can display on your website. To do this, expand the Ad load section and use the slider to adjust the maximum number of ads you want to appear on your content.
You may not want to display ads on every page of your website, particularly if they compete with your own offerings or products. To prevent ads from appearing on specific pages, such as your product pages, scroll down to the Page Exclusions section and select the Manage link. In the subsequent panel, click on Add exclusion:
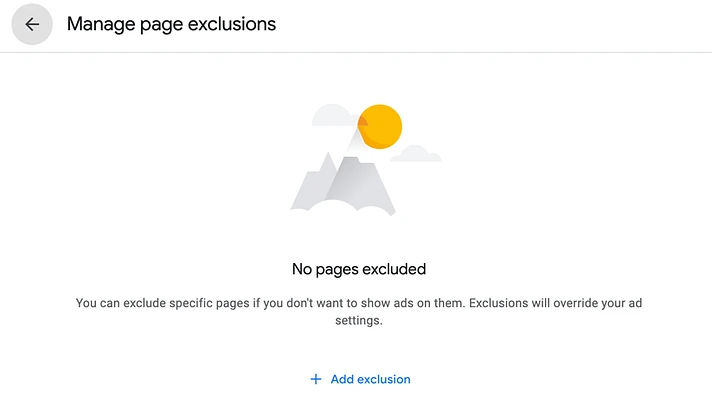
After accessing the Page Exclusions section, you can choose the pages or sections where you don’t want Google to display ads. You can even exclude entire sections of your site that share the same prefix if needed. After selecting all the exclusions, click on the Add button. Once you are satisfied with your ad settings, simply choose Apply to Site. You can now decide whether to apply these changes immediately, or test them first:
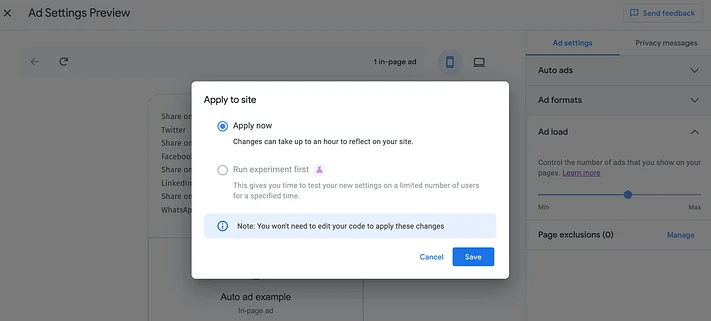
Conducting an experiment is an effective method for enhancing the performance of your ads. It allows you to compare one set of ad settings with variations to determine which one performs better. Google splits your website traffic between the two versions of the ad, enabling you to monitor their effectiveness.
Conclusion
Monetizing a website is essential to keep it running, and this is no different for most websites. But, generating a sustainable income can be challenging. Fortunately, Google AdSense is an easy-to-use tool that enables website owners to effortlessly create ads, place them on their sites, and earn cash with little effort.
The good news is that integrating AdSense with WordPress is a breeze. With the help of the Google Site Kit plugin, you can automatically add the AdSense code to every page of your website. You can then use the AdSense console to control the appearance of the advertisements on your site, and exclude specific pages if necessary.
FAQs About How to Integrate Google AdSense With WordPress
Q: What is Google AdSense?
A: Google AdSense is a program that allows website owners to display ads on their site and earn money when visitors click on them.
Q: Can I use Google AdSense with WordPress?
A: Yes, you can easily integrate Google AdSense with WordPress using the Google Site Kit plugin.
Q: How do I connect my WordPress website to Google AdSense?
A: To connect your WordPress website to Google AdSense, you need to create a Google AdSense account and then use the Google Site Kit plugin to add the AdSense code to your site.
Q: Is it easy to add Google AdSense to WordPress?
A: Yes, it’s very easy to add Google AdSense to WordPress using the Google Site Kit plugin. The plugin automates the process of adding the AdSense code to your site, and you can control how the ads appear on your site using the AdSense console.
Q: Can I control where the ads appear on my WordPress site?
A: Yes, you can control where the ads appear on your WordPress site using the AdSense console. You can exclude specific pages or sections of your site from displaying ads, and you can also set a maximum number of ads that Google can place on your site.
Q: How can I optimize my AdSense ads for better performance?
A: You can optimize your AdSense ads for better performance by running experiments to compare different ad settings and tracking the results. You can also use Google’s auto-ads feature, which automatically places ads where they are likely to perform best.

